
Imagine you are playing your favorite game on your phone. You are enjoying the graphics, the gameplay, and the story. Suddenly, you encounter a bug that crashes the game. You check the app store for an update, but there is none. You are frustrated and disappointed.
Now imagine you are developing a game with Unity. You want to deliver the best experience to your players, but you also want to save time and money. You don't want to recompile and resubmit your entire project every time you need to fix a bug or add a feature. You want to update your game without requiring users to download a new version of the app.
How can you achieve this?
The answer is hot updating.
Hot updating is a technique that allows you to update both code and resources of your game at runtime. This means that you can fix bugs, add features, and optimize performance without affecting the user experience.
But how can you implement hot updating in Unity?
In this blog post, I will introduce you a solution that can help you perform in-game updates in Unity with minimal effort and maximum flexibility. It is based on two open source projects: HybridCLR and Addressables.
HybridCLR is a framework that allows you to write C# code that can be compiled into IL2CPP or Mono assemblies at runtime. This means that you can update your game logic without recompiling your entire project.
Addressables is a Unity package that provides an easy way to load assets by key from local or remote locations.
By combining these two tools, you can perform in-game updates in Unity with minimal effort and maximum flexibility.
In this blog post, I will show you how to use HybridCLR and Addressables to perform in-game updates in Unity, and demonstrate how this solution can improve your game development workflow and user experience.
How to Install HybridCLR and Addressables
Before we can use HybridCLR and Addressables to perform in-game updates in Unity, we need to install and configure them properly. In this section, I will show you how to do that in a few simple steps.
First, open Package Manager from the menu bar and install the following two packages:
- Addressables - This package is available in Unity Registry. It provides an easy way to load assets by key from local or remote locations.
- HybridCLR - This package is not available in Unity Registry. You need to use
Add package from git URL...option and enter this URL: https://gitee.com/focus-creative-games/hybridclr_unity.git. This package is a framework that allows you to write C# code that can be compiled into IL2CPP or Mono assemblies at runtime.
Initialize HybridCLR
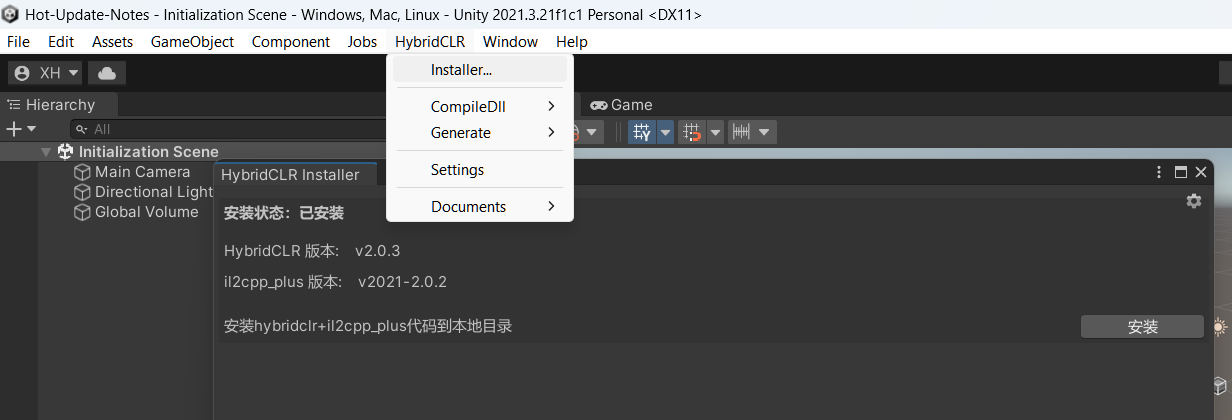
Next, open HybridCLR/Installer... from the menu bar to install and initialize HybridCLR.
Project Configuration For HybridCLR
Configure Player Settings
- Disable
Use Incremental GC. HybridCLR does not support this feature at the moment. This means that garbage collection will happen less frequently but more intensively. - Set
Scripting BackendtoIL2CPP. This is the scripting backend that HybridCLR uses to compile dynamic assemblies at runtime. It has better performance and security than Mono. - Set
Api Compatiability Levelto.Net Framework. This is the API level that HybridCLR uses to compile dynamic assemblies at runtime.

How to Split Assemblies into Static and Dynamic
In order to use HybridCLR to update our game code at runtime, we need to split our project's assemblies into two main categories: static assemblies and dynamic assemblies. Static assemblies are the ones that will be compiled into our app's binary file. Dynamic assemblies are the ones that will be compiled at runtime and can be updated without recompiling our app.
Static assemblies are also called AOT (Ahead-of-Time) assemblies because they are compiled before the app is launched. They have better performance and security than dynamic assemblies, but they cannot be updated after publishing.
Dynamic assemblies are also called Hot Update assemblies because they can be updated after publishing. They have more flexibility and convenience than static assemblies, but they have lower performance and security.
In this section, I will show you how to split our project's assemblies into static and dynamic using assembly definitions. I will also show you how to configure HybridCLR settings to recognize which assemblies are Hot Update assemblies.
In this example, I will create a static assembly called Assembly-Entry.dll using an assembly definition. It simply loads the Home Screen of my app using Addressables.LoadSceneAsync();. The Home Screen will download the Hot Update assemblies from the remote server and load them.
And I will use the default Assembly-CSharp.dll for game logic and Assembly-Updater.dll for updater as my Hot Update assemblies. The published app will load these two assemblies dynamically in order to update the game. Note: I can add more assemblies as Hot Update assemblies if necessary.
Here is how to do it in action:
- Create a folder
Assets/Scripts/Entryand create an assembly definition "Assembly-Entry.asmdef". - Create a folder
Assets/Scripts/Home Screenand create an assembly definition "Assembly-Updater.asmdef".
By default, Unity compiles almost all of your game scripts into the predefined assembly, Assembly-CSharp.dll.
Next, open HybridCLR/Settings from the menu bar and pay attention to these two fields:
Hot Update Assembly DefinitionsHot Update Assemblies
These two fields are equivalent. Do not add the same assembly twice.
In this example, I will add Assembly-CSharp and Assembly-Updater (without .dll) to Hot Update Assemblies.
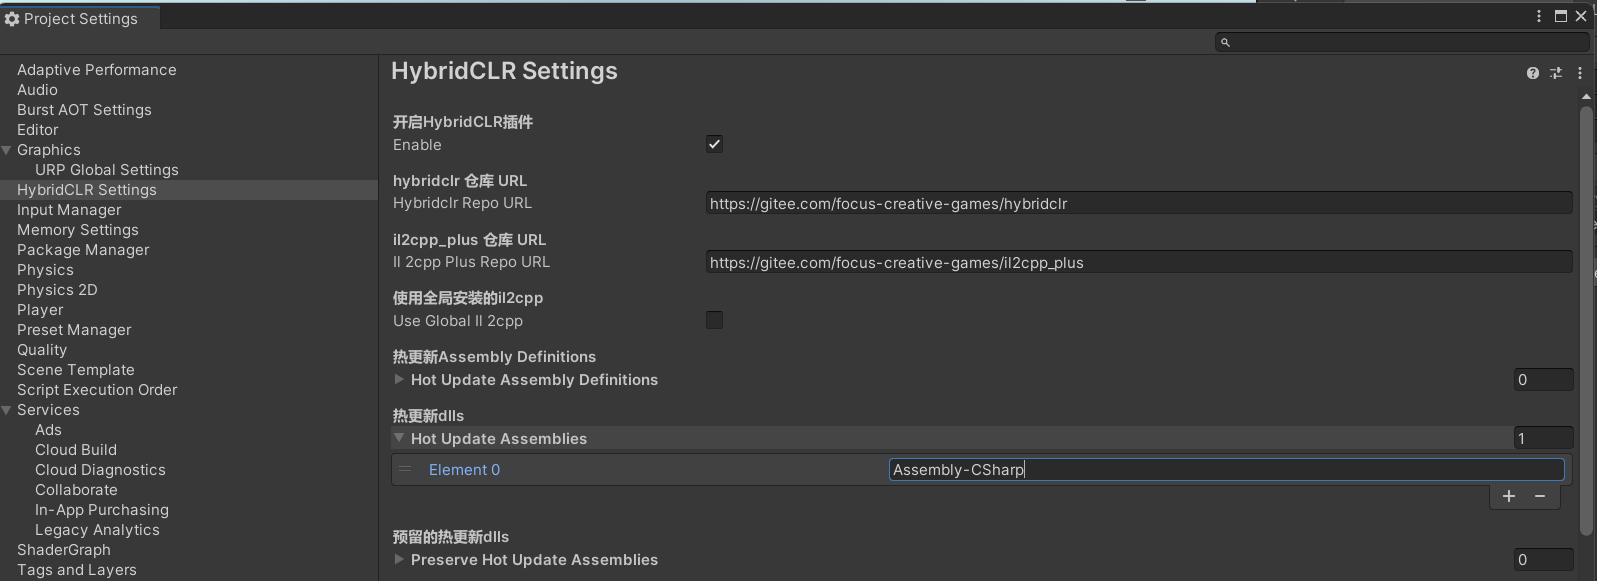
Do not add Assembly-Entry.dll, because it is shipped with the app and cannot be updated.
Now we have split our project's assemblies into static and dynamic using assembly definitions. We have also configured HybridCLR settings to recognize which assemblies are Hot Update assemblies. In the next section, we will see how to use Addressables to update our game resources.
Set Up Scenes and Addressables
In order to use Addressables to update our game resources at runtime, we need to set up our scenes and configure Addressables properly. In this section, I will show you how to do that in a few simple steps.
Addressables is a Unity package that provides an easy way to load assets by key from local or remote locations. It has many advantages over traditional asset management methods, such as reducing build size, improving loading speed, simplifying dependency resolution, and enabling hot updating.
However, using Addressables also comes with some challenges. We need to create different profiles and groups for our assets, assign them labels and addresses, and manage their loading and unloading.
In this example, I will create three scenes:
- Entry Scene (the only scene that is in the app, the only scene in Build Settings)
- Home Screen Scene (used to download dynamic assemblies and assets from the remote server and load them)
- Game Play Scene (normal game play scene)

Next, I will configure Addressables for these scenes.
Addressables Profile
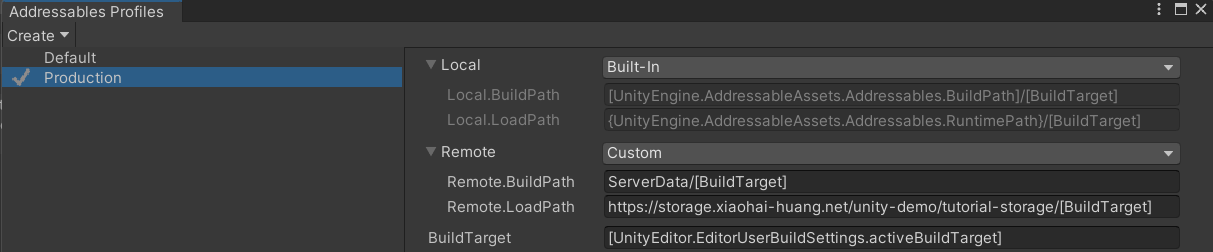
Create an Addressables Profile called Production. Change Remote.LoadPath to your URL (the place that stores your dlls and hot update assets). In my case, these hot update assets are stored in https://storage.xiaohai-huang.net/unity-demo/tutorial-storage/StandaloneWindows64
Addressables Group
Create two groups, Scene Group and Dll Group.
- Add "Home Screen Scene" and "Game Play Scene" to the Addressable Group called "Scene Group".
- Add
xxx.dll.bytesfiles underAssets/Dllsto the "Dll Group" and assign them labels as shown in the screenshot above.
These xxx.dll.bytes will be generated when we compile the code using HybridCLR/Build/Copy Hot Update Dlls and Metadata for AOT Assemblies.
Entry Scene
The Entry Scene is the only scene that is in our app's binary file. It is responsible for loading the Home Screen Scene from the remote server. The Home Screen Scene will download and load the dynamic assemblies and assets that we want to update.
The Entry Scene is also responsible for executing LoadMetadataForAOTAssembly to supply metadata for AOT assemblies. This is necessary for generics to work with HybridCLR.
In this section, I will show you how to create the Entry Scene which contains a game object that uses HybridCLR and Addressables.
The script should be part of the Assembly-Entry.dll assembly because it will be shipped with the app and cannot be updated after we build the app.
Here is the code for the script:
using HybridCLR;
using System.Data.SqlTypes;
using System.Reflection;
using System.Threading.Tasks;
using UnityEngine;
using UnityEngine.AddressableAssets;

public class GameEntry : MonoBehaviour
{
    public AssetLabelReference UpdaterDllLabelRef;
    public AssetLabelReference AOTMetadataDllLabelRef;

    public AssetReference HomeScreenSceneAssetRef;

    async void Start()
    {
        print("[GameEntry] Loading Metadata for AOT Dll...");
        await LoadMetadataForAOTAssemblies();

        print("[GameEntry] Loading Updater Dll...");
        var dll = await Addressables.LoadAssetAsync<TextAsset>(UpdaterDllLabelRef.labelString).Task;
        Assembly.Load(dll.bytes);


        print("[GameEntry] Loading Home Screen...");
        HomeScreenSceneAssetRef.LoadSceneAsync();
    }

    async Task LoadMetadataForAOTAssemblies()
    {
        var dlls = await Addressables.LoadAssetsAsync<TextAsset>(AOTMetadataDllLabelRef.labelString, null).Task;
        HomologousImageMode mode = HomologousImageMode.SuperSet;

        foreach (var dll in dlls)
        {
            LoadImageErrorCode err = RuntimeApi.LoadMetadataForAOTAssembly(dll.bytes, mode);
            print("[LoadMetadataForAOTAssemblies] Loading " + dll.name + err);
        }
    }
}
Home Screen Scene
The Home Screen Scene is the scene that we load from the remote server using Addressables. It is responsible for downloading and loading the dynamic assemblies and assets that we want to update. It also provides a button for the user to start playing the game.
The Home Screen Scene is part of the Scene Group in Addressables. It can be updated without recompiling our app.
The script that controls the Home Screen Scene is part of the Assembly-Updater.dll assembly. It is also a dynamic assembly that can be updated without recompiling our app.
In this scene, create a Empty Game Object called "App Updater" and attach it with the following script.
using TMPro;
using System.Reflection;
using System.Threading.Tasks;
using UnityEngine;
using UnityEngine.AddressableAssets;
using UnityEngine.UI;

public class Updater : MonoBehaviour
{
    public AssetLabelReference HotUpdateDllLabelRef;
    public Button PlayButton;

    async void Start()
    {

        print("[Updater] Loading Dlls");

        PlayButton.interactable = false;
        var text = PlayButton.GetComponentInChildren<TextMeshProUGUI>();
        text.text = "Loading...";
        await LoadDlls();
        text.text = "Play";
        PlayButton.onClick.AddListener(LoadGamePlayScene);
        PlayButton.interactable = true;
    }

    async Task LoadDlls()
    {
        await LoadHotUpdateAssemblies();
    }

    async Task LoadHotUpdateAssemblies()
    {
        var dlls = await Addressables.LoadAssetsAsync<TextAsset>(HotUpdateDllLabelRef.labelString, null).Task;
        foreach (var dll in dlls)
        {
            print("[LoadHotUpdateAssemblies] Loading " + dll.name);
            Assembly.Load(dll.bytes);
        }
    }
    void LoadGamePlayScene()
    {
        Addressables.LoadSceneAsync("Assets/Scenes/Game Play Scene.unity");
    }
}
Game Play Scene
In this scene, you can do the normal unity stuff.
How to Buiild the Player
In order to build our app with HybridCLR and Addressables, we need to create an editor command that compiles and copies our dynamic assemblies to the desired location. This location will be later bundled by Addressables and uploaded to the remote server
The editor command is a script that uses HybridCLR.Editor.Commands namespace. It performs three tasks: compiling dynamic assemblies for the current build target, copying them to Assets/Dlls/Hot Update Dlls folder, and copying metadata for AOT assemblies to Assets/Dlls/Metadata For AOT Dlls folder.
The editor command also clears Addressables output cache to ensure that the latest dynamic assemblies are bundled.
This command is necessary because we want to update our game code without recompiling our app. By using Addressables to bundle and distribute our dynamic assemblies, we can reduce our app size, improve our loading speed, simplify our dependency resolution, and enable hot updating.
However, using Addressables also comes with some challenges. We need to make sure that our dynamic assemblies are compatible with our static assemblies, that they are compiled for the correct build target, that they have metadata for AOT assemblies, and that they are bundled with the correct settings.
In this section, I will show you how to create an editor command that compiles and copies our dynamic assemblies using HybridCLR.Editor.Commands.
using HybridCLR.Editor;
using HybridCLR.Editor.Commands;
using System.Collections;
using System.Collections.Generic;
using System.IO;
using UnityEditor;
using UnityEditor.AddressableAssets.Build;
using UnityEditor.AddressableAssets.Settings;
using UnityEditor.AddressableAssets;
using UnityEditor.Build.Pipeline.Utilities;
using UnityEngine;

public static class CopyDllsAndClearAddressablesCacheCommand
{
    [MenuItem("HybridCLR/Build/Copy Hot Update Dlls and Metadata for AOT Assemblies")]
    private static void Execute()
    {
        BuildTarget target = EditorUserBuildSettings.activeBuildTarget;
        CompileDllCommand.CompileDll(target);

        CopyHotUpdateAssembliesToMyFolder(target);
        CopyMetadataForAOTAssembliesToFolder(target);
        ClearAddressablesOutput();
    }

    private static readonly string MY_HOT_UPDATE_ASSEMBLIES_FOLDER = "Assets/Dlls/Hot Update Dlls";
    private static void CopyHotUpdateAssembliesToMyFolder(BuildTarget target)
    {
        string hotfixDllSrcDir = SettingsUtil.GetHotUpdateDllsOutputDirByTarget(target);
        string hotfixAssembliesDstDir = MY_HOT_UPDATE_ASSEMBLIES_FOLDER;

        foreach (var dll in SettingsUtil.HotUpdateAssemblyFilesExcludePreserved)
        {
            string dllPath = $"{hotfixDllSrcDir}/{dll}";
            string dllBytesPath = $"{hotfixAssembliesDstDir}/{dll}.bytes";
            File.Copy(dllPath, dllBytesPath, true);
            Debug.Log($"[CopyHotUpdateAssembliesToMyFolder] copy hotfix dll {dllPath} -> {dllBytesPath}");
        }
    }

    private static readonly string METADATA_FOR_AOT_ASSEMBLIES_FOLDER = "Assets/Dlls/Metadata For AOT Dlls";
    private static void CopyMetadataForAOTAssembliesToFolder(BuildTarget target)
    {
        string aotAssembliesSrcDir = SettingsUtil.GetAssembliesPostIl2CppStripDir(target);
        string aotAssembliesDstDir = METADATA_FOR_AOT_ASSEMBLIES_FOLDER;

        foreach (var dll in SettingsUtil.AOTAssemblyNames)
        {
            string srcDllPath = $"{aotAssembliesSrcDir}/{dll}.dll";
            if (!File.Exists(srcDllPath))
            {
                Debug.LogError($"ab中添加AOT补充元数据dll:{srcDllPath} 时发生错误,文件不存在。裁剪后的AOT dll在BuildPlayer时才能生成,因此需要你先构建一次游戏App后再打包。");
                continue;
            }
            string dllBytesPath = $"{aotAssembliesDstDir}/{dll}.dll.bytes";
            File.Copy(srcDllPath, dllBytesPath, true);
            Debug.Log($"[CopyMetadataForAOTAssembliesToFolder] copy AOT dll {srcDllPath} -> {dllBytesPath}");
        }
    }

    private static void ClearAddressablesOutput()
    {
        var settings = AddressableAssetSettingsDefaultObject.Settings;
        var pathValue = settings.profileSettings.GetValueByName(settings.activeProfileId, "Remote.BuildPath");
        var path = settings.profileSettings.EvaluateString(settings.activeProfileId, pathValue);
        Debug.Log($"build path = {path} {Directory.Exists(path)}");
        if (Directory.Exists(path))
        {
            Directory.Delete(path, true);
            Debug.Log($"[ClearAddressablesOutput] Deleted {path}");
        }
        CleanBuildCache();
        Debug.Log($"[ClearAddressablesOutput] Clean Addressables Build Cache");

    }

    static void CleanBuildCache()
    {
        OnCleanAddressables(null);
        OnCleanSBP();
    }

    static void OnCleanAddressables(object builder)
    {
        AddressableAssetSettings.CleanPlayerContent(builder as IDataBuilder);
    }

    static void OnCleanSBP()
    {
        BuildCache.PurgeCache(true);
    }
}
Full Player Build
For a full player build, you need to do the following steps:
- Click
HybridCLR/Generate/All. - Click
HybridCLR/Build/Copy Hot Update Dlls and Metadata for AOT Assemblies. (Note: add thesexxx.dll.bytesto the "Dll Group" inAddressables Groupstab if you have not done, see add "xxx.dll.bytes" to Dll Group) - In
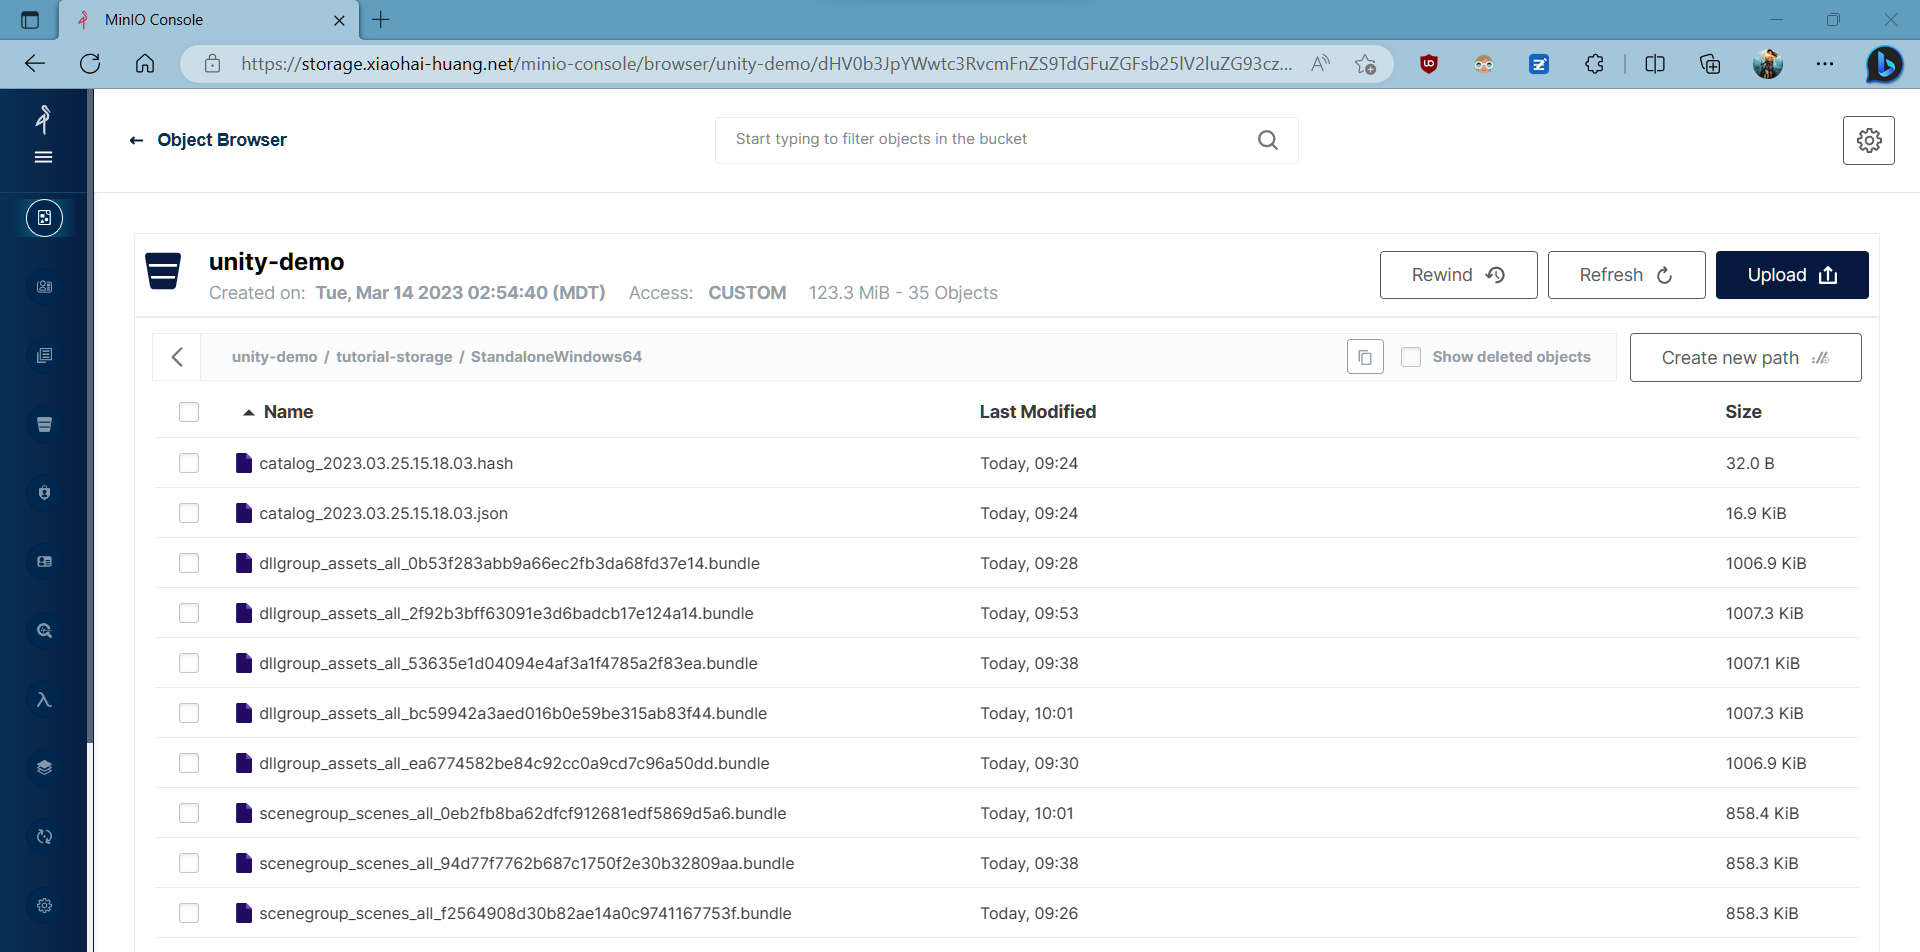
Addressables Grouptab, clickBuild/New Build/Default Build Script. - Upload the folder
ServerDataat your project root to the remote storage. - Build your player using
File/Build And Run.
Hot Update
For updating code in your published app, you need to do the following steps:
- Click
HybridCLR/Build/Copy Hot Update Dlls and Metadata for AOT Assemblies. - In
Addressables Grouptab, clickBuild/Update A Previous Buildand choose the target platform's.binfile generated byBuild/New Build/Default Build Scriptwhen you do the full player build. - Upload the folder
ServerDataat your project root to the remote storage.